Connecting Git with Github
Contents
Configuring Git and Linking it with GitHub
Git is a version control system that allows you to track changes in your projects and collaborate with others. After installing Git, it’s essential to configure it properly and link it with your GitHub account to ensure smooth version control and collaboration. Below are the steps to get you started with Git and GitHub.
Step 1: Installing Git
Before using Git, you need to install it. You can download and install Git from the official website: Git Downloads.
Once installed, you can check the version in your computers' terminal or powershell to ensure it is properly set up by running:
git --version
This will output the current Git version installed on your system.
Step 2: Configuring Git globally with Username and Email
Once Git is installed, you should configure your identity, which will be associated with your commits. Run the following commands to set up your name and email: Please use the same e-mail that you have already on your Github account.
git config --global user.name "Your Name"
git config --global user.email "your.email@example.com"
The --global flag ensures that this configuration applies to all repositories on your system.
To verify the configuration, use:
git config --list
This command will list all your Git configuration settings, including your username and email.
Step 3: Generating an SSH Key
To link Git with GitHub securely, you'll need to generate an SSH key, which will be used for authentication. Run the following command to generate a new SSH key: Read the github documentation for more details: Generating new SSH key
The following instructions are derived from this documentation, and for this wiki example, we are using the Mac section. There are some minor differences with other operative systems, but the logic is the same. You can follow this wiki article and the Windows documentation from Github.
Following the documentation, in your terminal, type (the email is the same you are using in the global configuration of Git and Github):
ssh-keygen -t ed25519 -C "your.email@example.com"
You will get prompted the following:
Generating public/private ed25519 key pair.
Enter file in which to save the key (/Users/your_user/.ssh/id_ed25519):
</<syntaxhighlight>

Now, you type one of the following filenames from the box below
<div class="alert alert-warning" role="alert">
The filenames of supported public keys for GitHub are typically:
<pre>
id_rsa
d_ecdsa
id_ed25519
</pre>
When generating a key, it will be saved with one of these filenames depending on the type of key you choose.
</div>

For example, you can indicate '''id_rsa''' as your file
<syntaxhighlight lang="bash">
Generating public/private ed25519 key pair.
Enter file in which to save the key (/Users/your_user/.ssh/id_ed25519): id_rsa
After inserting the file in the previous prompt, you will get prompted the following:
Enter passphrase(empyty for no passphrase):
You can leave it as it is (with no passphrase) and just press Enter.
Then, you have to confirm again the passphrase, so press Enter again.
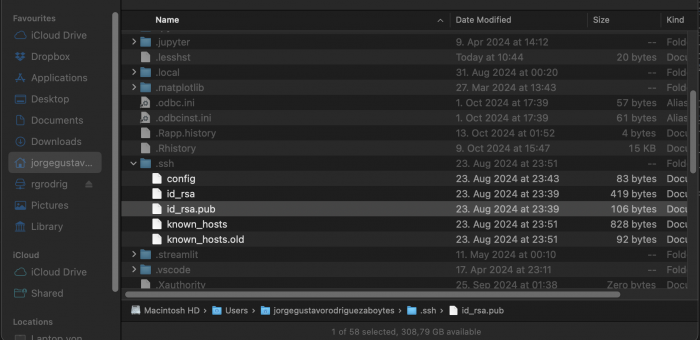
To see where your SSH Key is, go to your user or home directory, and then reveal the hidden files.
To reveal hidden files in MacOS the shortcut is Command Shift Dot and in Windows, go to File Explorer, click View on the menu bar, and locate Show/hide
Adding SSH Key to SSH agent
To start the SSH agent with your SSH key, run:
eval "$(ssh-agent -s)"
You will get this after running the command
Agent pid 59566
Don't worry if the number is different.
Now, check if you have a ~/.ssh/config. In the image above, you can see that there is a config file.
You can check the existence of this file by running in the command the following:
open ~/.ssh/config
If get something like this:
> The file /Users/YOU/.ssh/config does not exist.
Then create this config file by running:
touch ~/.ssh/config
Beware that you may have to adapt the commands if you pathname has different names
Next, open this config file and add the following text:
Host github.com
  AddKeysToAgent yes
  UseKeychain yes
  IdentityFile ~/.ssh/id_rsa
- Beware that you may have to adapt the commands if you pathname has different names.
- Omit the line the UseKeychain yes if you didn't add any passphrase.
- Note that in this example, the file where the key is
id_rsa, so, if you put another name, change it in the line where says IdentityFile ~/.ssh/
Now, to add your private SSH Key to the SSH-Agent, you have run this command:
ssh-add ~/.ssh/id_rsa
Note that if you did decide to put passphrase in your keychain, you need to include --apple-use-keychain in the above command.
If no error appears, you should get something like:
Identity added: /Users/your_user/.ssh/id_rsa (your_email)
Now, the SSH Agent is set up to use your private key for authentication in Github.
Step 4: Adding SSH Key to GitHub
Next, you need to add the generated SSH key to your GitHub account. First, copy the public key by running:
cat ~/.ssh/id_rsa.pub
This will print your SSH key, starting with ssh-ed25519. Copy the entire key (yes, including the email).
Now, go to your GitHub account: 1. In the top right corner, click on your profile picture and go to Settings. 2. In the left sidebar, navigate to SSH and GPG keys. 3. Click New SSH key, paste your SSH key (the one that got printed in the terminal) into the key field, and give it a descriptive title. 4. Click Add SSH key to save.
Step 5: Testing the SSH Connection
To verify that everything is working, test the SSH connection to GitHub:
ssh -T git@github.com
If successful, you will see a message similar to:
Hi username! You've successfully authenticated, but GitHub does not provide shell access.
Now that Git is configured and linked with GitHub, you can clone, pull and push repositories using SSH. You can manage projects, push changes, and collaborate with others.
References
Git documentation Github documentation
The author of this entry is Gustavo Rodriguez.
