Difference between revisions of "Anaconda"
| Line 1: | Line 1: | ||
| + | THIS ARTICLE IS STILL IN EDITING MODE. | ||
| + | |||
== 1. What is Anaconda? == | == 1. What is Anaconda? == | ||
[[File:Anaconda Logo.png|thumb|right|Source: wikimedia.org]] | [[File:Anaconda Logo.png|thumb|right|Source: wikimedia.org]] | ||
Revision as of 10:19, 27 January 2023
THIS ARTICLE IS STILL IN EDITING MODE.
Contents
1. What is Anaconda?
Anaconda is an open-source Python and R distribution that includes access to different IDEs, such as Spyder and pyCharm, as well as Jupyter Notebook among others. It is aiming at simplifying package management and claims to be the “world's most popular data science plattform” (1).
2. What's included in Anaconda Distribution?
Included in the basic Anaconda distribution is the Conda package and environment management system as well as the applications Anaconda Navigator, a Powershell terminal, JupyterLab and Jupyter Notebook, as well as the Spyder IDE. These modules are briefly introduced in the following.
Conda
“Conda is an open-source package and environment management system that runs on Windows, macOS, and Linux. Conda quickly installs, runs, and updates packages and their dependencies. It also easily creates, saves, loads, and switches between environments” (2) on a local computer.
Anaconda Navigator
“Desktop application to easily manage integrated applications, packages, and environments” (2) with a graphical user interface instead of using the command line.
Jupyter Notebook
“Web-based, interactive computing notebook environment to edit and run human-readable documents while describing data analysis.” (3)
JupyterLab
“Extensible Environment for interactive and reproducible computing, based on the Jupyter Notebook and Architecture.” (3)
Spyder IDE
A scientific Integrated Python Development Environment “with advanced editing, interactive testing, debugging and runtime introspection features.” (3)
3. Basic features/properties of Anaconda
The three main features Anaconda claims is that the distribution is
1. "open-source",
2. "user-friendly" and
3. "trusted".
This means that the code is freely accessible and assessable for projects in any field. Moreover, the intuitive platform allows for easy package and environment handling, all while the “securely hosted packages and artifacts are methodically tested and regularly updated” (2) to avoid conflicts, bugs or scams.
4. How to install Anaconda on my machine
Anaconda Distribution can be installed free of charge for private use for Windows, macOS and Linux. The newest version currently features Python 3.9.
Its installation process is straight forward: Download the installation file, choose a path and follow the steps. No account is needed. As a student you can choose to sign up for Anaconda Nucleus for “Community membership, unlimited environment backups (and) exclusive data science content” (4) for free.
Click here to directly download the installer for your operating system. For Windows and MacOS, graphical installers are provided. For Linux, there are only installation scripts that have to be run from the terminal.
For an in-depth description and links to download Anaconda for older operating systems, you can make use of their extensive documentation.
If a more minimalistic approach is preferred, Miniconda can be installed. This version just includes conda, Python and necessary dependencies: Install Miniconda
In case of issues during the installation process, please refer to the help page.
5. Using Conda
Conda is a command line tool used in a terminal to interact with Anaconda. It is a package and environment management software. It can be used to install or update packages, create, save and load environments. To start using conda, open a terminal, type conda and press enter.
To open a terminal on windows, press CTRL + R, type cmd. exe (write this without a space, we're sorry, this is due to Wiki formatting) and press enter. On macOS, open launcher and type terminal into the search box, clicking the icon when it appears. On Linux, the shortcut Super + T should do the job, otherwise it can be found in the applications menu.
6. Using Anaconda Navigator
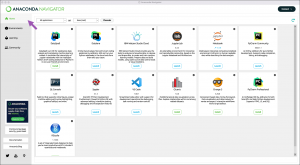
Anaconda Navigator is a desktop application to manage environments and packages via a graphical user interface rather than the conda command line interface. It is automatically installed with Anaconda Distribution version 4.0.0 or higher. In the left column of the Navigator you can switch between the program's four main components. On the Learning page and Community page you can access documentation and training related to the Navigator and find out about support forums and social networking activities in the field. The following section describe in more depth the Home page and the Environments page that allow you to manage applications and environments.
Home page
On the Home page, you can launch and install applications in the active environment by clicking the respective button on one of the application tiles. Additionally, you can use the gear icon in the top-right corner of the tiles to update, remove, or install a specific version of an application. Note that these actions will only apply to the currently-active environment, which you can select with the Applications on drop-down located on top of the tiles menu. Two important built-in applications are Spyder for writing and executing code and Jupyter Notebook for generating notbooke files. The Anaconda documentation includes a comprehensive list of all applications that are included by default and instructions on how to build your own Navigator applications.
Environments page
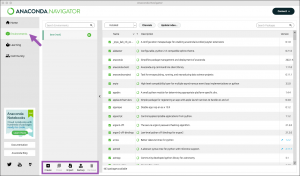
The Environments page, like Conda, allows you to create and activate environments as well as install, update, and remove packages.
Create an environment
Click on the Create button at the bottom of the Environments list. A dialog box appears where you can name your environment and select the versions of Python and/or R you want to work with. You can also choose to import an environment from your local drive or Anaconda Nucleus (Import button) or clone an existing environment (Clone button).
Activate the environment
In the environments list in the left column, click on the arrow button next to the name to activate the environment you want to use.
Installing, updating and removing packages
By default, the right table displays all packages that are installed in the active environment. You can use the filter on top of the list to view not installed, updatable, selecte, or all packages instead. Note that you can use the Channels button to adjust the locations where Navigator searches for packages. See Managing channels for further information on channels. To install a new package, click the Apply button for an uninstalled package. To update a package, remove a package or install a different package version, click on the checkbox infront of the package name, select the respective action, and click Apply.
If you run into problems or want to explore the functions of Anaconda Navigator further, you can access the documentation via the Help button in the top-left corner of the Navigator.
References
(2) https://www.anaconda.com/products/distribution
(3) https://docs.anaconda.com/navigator/overview/
(4) https://www.anaconda.com/pricing#
(5) https://www.dominodatalab.com/data-science-dictionary/anaconda/


