Difference between revisions of "Setting up Python Work Environment"
| Line 20: | Line 20: | ||
<imagemap> | <imagemap> | ||
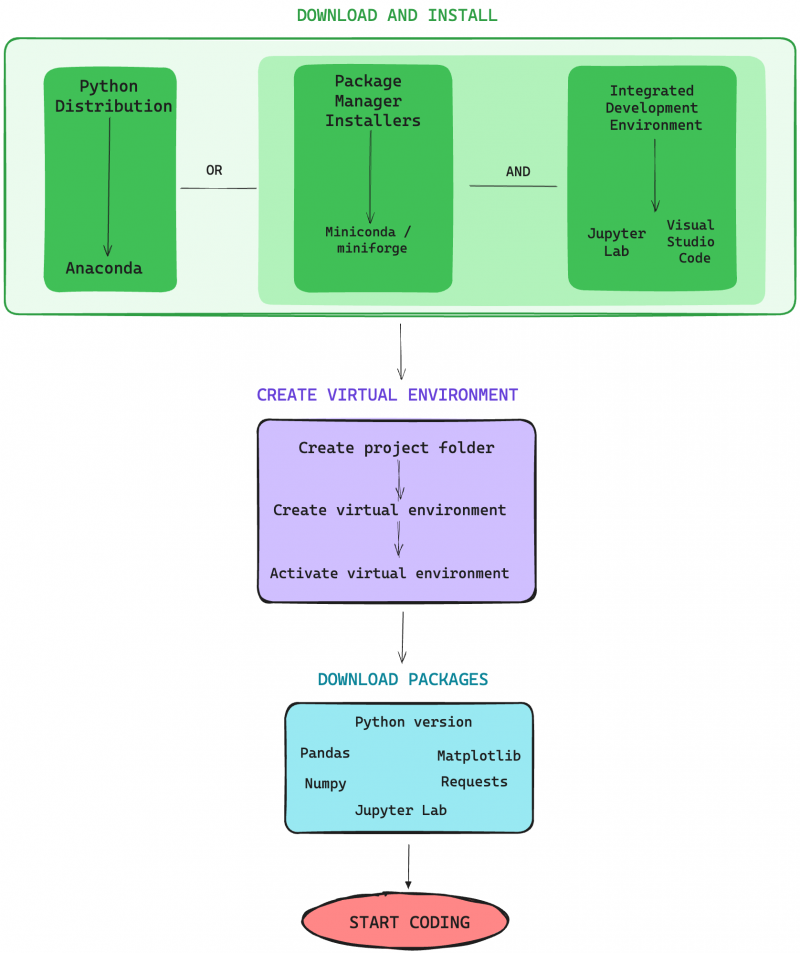
| − | + | Image:Set up 2.png|800px|thumbnail|center|Set up roadmap clikcable diagram. Source: own. | |
rect 739 1223 182 273 [[Anaconda]] | rect 739 1223 182 273 [[Anaconda]] | ||
rect 1230 269 1900 1232 [[Package Managers in Python]] | rect 1230 269 1900 1232 [[Package Managers in Python]] | ||
Revision as of 14:13, 26 July 2024
EDITION MODE. REFERENCES ARE MISSING. THERE ARE TYPOS.
You may be wondering, how do I install Python? This is a simple question with a more less complicated answer if you are new to programming.
Contents
STOP! Read this before installing Python
Downloading and installing Python is not as straightforward as it seems. For example, if you have already some experience with R, you know that in order to install R you go the R-CRAN, and then (if you prefer) you download and install Rstudio, which is the working environment to write and execute R code.
In the case of Python, of course you can go to https://www.python.org/ and download the latest Python release. However, for best practices, it is recommended to have different versions or releases of Python isolated in different virtual environments. This is because some packages and libraries work better in different python versions, or better said, they were created and optimised using specific python versions.
For example, if you want to use a Python program to transcribe automatically audio files (e.g., interviews) using Whisper openAI model, it is recommended to use Python versions from 3.8 to 3.11.
This might be a bit confusing but everything will be explained in the respective wiki entries.
Getting started: Overview
If you want to start right away without installing anything because you want to start immediately and/or probably your computer has not enough computational resources, you can start coding directly and instantly in Google Colab. However, it is recommended to check your hardware and software characteristics of your device.
Here you can have an overview and the steps you can follow:
Download and Install
There are two options in this first step: Either downloading a Python distribution such as Anaconda or package manager together with an Integrated Development Environment
Anaconda is Python distribution is a software that bundles together the core Python interpreter, the Python standard libraries that are popular for specific data analysis tasks and several Integrated Development Environments, such as PyCharm, Jupyter Lab, Visual Studio Code. Therefore you don’t need to install them as they come included in the whole distribution package. Anaconda also comes with conda as the package manager.
A package manager is a software assistant that helps to install and manage python versions, packages, libraries, and tools and/or create virtual environments. Package managers such as miniconda or miniforge are similar to Anaconda but in a light version and without pre-installed features, which allows more flexibility and less hassle in the configuration of your data analysis projects set up. Additionally, package managers (1) manage dependecies, that is, it installs the correct versions of the libraries to ensure compatibility, (2) allows easy update or downgrade of libraries and dependencies according to your needs, and (3) creates separate virtual environments to avoid dependencies conflicts. To download and install packages with these assistants, you have to use your computer terminal.
An IDE is a friendly-user interface to program and run the code. It provides many functionalities to avoid typo errors in your code, trace errors, highlight syntax, etc. It is also possible to configure the IDE according to your project needs. While you have to download an IDE as a normal software from the internet, it is also possible to download IDE’s through your computer terminal using a package manager.
Creating virtual environments
Creating a virtual environment is like creating a workspace for specific projects. Using an analogy, a virtual environment is like having a workshop. You can have a workshop to repair bikes, another workshop for carpentry, or workshop for knitting and weaving clothing. It is ideal to have a dedicated workshop for each activity i.e., bike repairing, carpentry and weaving, and to have them isolated from each other. You don’t want to mix up tools, materials, etc. However, in reality, because of financial and space constrains, it is hard to afford having specific workshops for each activity we want. However, for data analysis, these constraints don’t exists and you can create several different virtual environments. For example, you can create a virtual environment for regular data analysis, another for general machine learning tasks, another for natural language processing, etc. In each of these environments you may have different versions of python, and different versions of some libraries.
Download packages
Once you have created and activated your virtual environment, the final steps is to download and install the tools and libraries that you need. Which ones? That depends on the project your embarking on!
